Showing posts with label Crafts. Show all posts

Monday, August 23, 2010

The Grouchy Ladybug

We've been reading a few books from the library lately and one of them is "The Grouchy Ladybug" by Eric Carle.  We read both the English and Spanish version, "La Mariquita Malhumorada".  So I decided to use another used carton from the bottom of a frozen pizza to make a ladybug.


MD had fun making it even though a was process that took a couple of days to finish.  Not that it was complicated, it's just we needed time for the layers of paint to dry and by the time the paint was dry I was busy with something else around the house.


I found another spare piece of carton in the garage to cut out the shape of the body to paint black.


But we ran into a problem.  I had never ever realized that we don't have any black tempera paint in the house.  So we improvised.  I use to work with oil paints and always made black by combining blue and brown.  So I tried it with tempera paints.  That made a dark grey color, to which I added black food color, and there you have it.  Black paint!


On the last day, MD glued black construction paper dots to the bugs wings, and I stapled it all together, adding small pipe cleaner antennae and googly eyes.  I also grabbed a piece of chalk to draw in a mouth and asked MD if we wanted me to add a grouchy mouth or a happy mouth.  He chose happy.


Wednesday, August 11, 2010

Watercolor Ocean (and Park) Resist


We recently took a few family trips both two the beach and to an aquarium where the kids got to see many types of sea life.  MD has been infatuated with sealife, especially sharks for quite a while now.  So I wanted to focus some art activities on this theme.  Here is our watercolor ocean resist.  I drew the sea creatures with crayon, colored in a couple of them, and then had MD color the rest.  The funny thing is, MD has never really colored in a coloring book.  Most, if not all his art has been pretty "free" so he really did not get the concept of coloring inside the lines.  This is the first time I showed him how to stay inside, but of course he did not. 


I really don't know how to go about this because small part of me thinks he should learn to color inside the lines and maybe he should know this by now, or at least try.  But another part of me (a bigger part) feels that this would be hindering the creativity that I am trying to encourage in him.  So for now I guess I'll wait.


This is our ocean, after he colored and then brushed over it with blue and teal watercolors.


And this is his picture of a "park" he did all by himself. 

Friday, August 6, 2010

Beach Sand Playdough


I made a batch of playdough for MD this week and added a little bit of black food color (to make it grey) and a whole lot of beach sand from our recent trip.  Since he's been excited about making sandcastles I thought this was a great idea when I saw it on Counting Coconuts. 


It is definately fun but I think I added to much sand because it's a little on the dry side.  Still works though. 


This is our quick mini castle.

Wednesday, June 16, 2010

Happy Father's Day!


Once again I borrowed some inspiration from one of my favorite blogs, Frugal Family Fun Blog to make these cute Father's Day Cards, out of office labels.  There are so many ideas in this blog, and I knew I had to do this one when I saw it.   


Sadly, MD's participation in this project was minimal since he cannot quite cut small details like the fish shapes out of color coded labels here.  He did help me with the placement of the fish and wrote his own message inside the card (with my help also).  And he drew a picture inside the card for dad.  S.E. also scribbled inside his card for dad and almost tore the paper. 

On the other hand, I had a great time working on these cards and they were quick to make.  And both my boys had a blast and laughed out loud while they tore and wrinkled the scraps of paper I left while I was making the cards. 


Sunday, May 9, 2010

Flowers for Mother's Day

MD and I made this Mother's Day card for my mother the other day based on an idea for a science type activity I saw on Family Fun Magazine. 

I took flowers from our garden and laid them on a piece of watercolor paper folded in half.  Covered the flowers with a paper towel and let MD hammer the flowers down until colors were showing through the paper towel.  It was pretty neat to see the colors start popping out after he hit the paper. 

When finished I peeled the smashed flowers off.  The paper towel looked great! 

I think I have really low quality watercolor paper though because it did not absorb much of the flower pigment so the card turned out like this.  That's why I ended up tracing the outline of the flowers with a black marker afterwards. :)

Tuesday, March 23, 2010

Number Crafts: Ten

We finally arrived at number ten.  This is the last number craft and MD had a lot of fun with it. 

Painting bubble wrap and pressing it on the number to paint it. 

Then adding glitter glue over the paint.

And glued ten little green beads under the number.


Tuesday, March 16, 2010

Easy Flowers

I cut out a leaf shape out of bubble wrap and let MD paint it green, then turn it over and press on construction paper.  He really enjoyed this and kept pressing it over and over.  Then we punched out circle shapes from yellow and purple paper to make some easy flowers to glue on top of the green paint after it dried. 

Thursday, March 11, 2010

Fun Shamrock Art

I thought I would show MD some cool kid friendly art "techniques" now that he's really liking this art thing.  So I thought of using a pointalism type style to paint a St. Patrick's Day Shamrock with three different shades of green.  I showed him how to dip the eraser tip of a pencil into the paint and make dots on the paper.  He did it for a little bit.  Then he decided he wanted to dip the cabinet handle that he had been playing with earlier into the paint and use that instead.  So I let him, same technique just a different tool.  But shortly after he got paint on his finger and wanted it cleaned.  I told him it was only a little paint and he could wipe it on the paper if he wanted.  Well that did it.  From then on this project became Finger Paint!  He loved spreading the paint around with his fingers.  I guess his sensory issues with gooey things is history now.  Finger Paints here we come! ♣


After the paint dried I cut out the shamrock shape since he painted all over the paper.  Not that I ever expect him to stay inside the lines☻

Wednesday, March 10, 2010

Number Crafts: Nine


I don't know what's wrong with my camera and blogger but I could not get this picture upright.  This one was easy and fun.

Wednesday, March 3, 2010

Sunday, February 28, 2010

Ready For Spring Paint Chip Tullips

I found these paint chips at Home Depot recently.  Since I usually go to Lowe's I hadn't seen these in "petal" shape before.  They also have these neat plastic rings for you to clip your samples with.

This was the easiest and cheapest craft ever.  We just clipped the chips together with brads to make spring time flowers. 

Monday, February 22, 2010

Wednesday, February 17, 2010

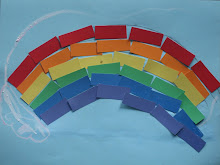
Rainbows, Trucks, and Cookies: Cheap Art

We've been on an art kick lately. Doing more art than anything else. It seems that since MD turned three he has really started getting into the whole art thing and actually lasting more than a couple of minutes doing it. I'm liking it. So we've been doing more of it.

 This rainbow was made out of cut up paint chips (paint samples).  My obsession with these freebies continues. 

This truck was made out of the wrapper paper for my Valentine's Day roses and coffee filters. 

Lastly a giant chocolate chip cookie made using tempera paint on the carton in back of a frozen pizza with black contruction paper chocolate chips. 

Tuesday, February 16, 2010

Number Crafts: Six

This week our craft number was six.  I like tissue paper art but MD didn't really care for it before so we had not used it in a while until recently when making some valentine cards with it and now for the number six.  He is really starting to enjoy using the tissue as he carefully laid it on the number and painted over it.  Makes me happy. 


These number crafts are a good way to fit art into the day and they have been great for teaching number recognition and counting. After they are complete I stick them onto cabinet doors in the kitchen and since we spend a lot of time there, MD looks at them a lot. Sometimes he points to each of them and says the number and then I encourage him to practice counting.


Tuesday, February 9, 2010

Number Crafts: Five

For number five, I put out some paint rollers and finger paint and tempera paint.  After a few rolls MD was no longer interested.  But once I suggested he use a car, he kept going and I even had to give him more paper to roll the tires on.  It ended up looking similar to the marble paint number.


Monday, February 8, 2010

Valentine's Cards


These are our Valentine cards for family and friends from our playgroup.  The top two are inspirations from Frugal Family Fun blog.  The first picure has cards made out of paint chips (paint chips quickly becoming one of my favorite items) and the second top picuture we used bleeding art tissue to make the water color look.  They didn't come out as nice as Frugal Family's though.  The first picture at the bottom are Valentine's I made up after my first attempt at the Reverse Resist cards from Frugal Family Fun did not work out since I used the wrong kind of tissue.  I ended up switching the water for liquid starch and cut up the tissue to make a tissue collage.  The last picture is cardstock I cut into squares.  I drew hearts on the white cardstock and had MD color them in with a red Crayola Twistables Slick Stix crayon.  These crayons are very bright and very smooth and the feel and look like lipstick on the Valentine cards (which I like) but they don't smudge off like lipstick would.  These were all fun to make and MD had a part in making them all including painting with water over tissue, painting with starch over tissue, sticking the foam hearts on the cards, coloring hearts, and cutting alongside me on extra paint chips while I cut out the cards.

Monday, February 1, 2010

Our Funny Valentines

We made cornstarch clay hearts with a recipe found in Family Fun magazine for a winter snow figures project.  This has a different texture than homemade play dough and dries/hardens faster, which I think is supposed to be the purpose of making the figures with it.  I like homemade play dough better but this was fun and easy.   


Tuesday, January 26, 2010

Number Craft: Four


This was an easy one.  Black and white ribbon and googly eyes.


Tuesday, January 19, 2010

Number Crafts: Three (and Birthday)

Painting with marbles is so much fun!


MD just happened to officially turn 3 years old the same week we learned about number three.  It feels like he's been three years old for a few months already and he started saying he was three years old since SE was born back in September.  But he actually just turned 3.   Happy Birthday my big boy!!